Monday, November 06, 2006

Kid's Easter Crafts Bunny Ears


Egg carton
Scissors
Pink crayon
Headband
Glue gun

Time needed: Under 1 Hour
1. Use scissors to cut out ear shapes from the edges of the egg carton top.

2. Color the insides of the ears with pink crayon.

3. Finsih by gluing the ears to a headband with the glue gun.

Kid's Easter Crafts Carrot Napkin Placesetting


Orange paper napkins, dinner size
Green plastic utensils
Green pipe cleaners

Time needed: Under 1 Hour
1. For each carrot, fold one of the paper napkins into a rectangle. Place a set of utensils across the lower left corner of the rectangle, fold in the lower right corner as shown, then roll it up loosely.

2. Wrap one or two green pipe cleaners around the napkin and necks of the utensils, then twist them to secure, as shown.

3. Trim the pipe cleaners a bit, if desired, so they look like leafy carrot tops.

Kid's Easter Craft Jelly Bean filled Carrots


Disposable clear plastic icing bags
Orange jelly beans
Scissors
Green tissue paper
Twist ties

Time needed: Under 1 Hour
1. Fill an icing bag with orange jelly beans, leaving at least 3 inches unfilled at the top.

2. Cut out two 8-inch squares of green tissue paper and lay one on top of the other.

3. Pick up the squares from the center and give them a little twist so you have a cone-shaped carrot top.

4. Place the tissue, twisted end down, into the bag.

5. Gather the bag at the top of the jelly beans and secure with a twist tie, wrapping the tie around the "stem" of the tissue paper, so the greenery sticks out of the top.

Kid's Easter Crafts Baby Chicks in a Basket

Kitchen shears
Small basket
Yellow work glove
Craft glue
Scissors
Felt
Small googly eyes
Easter grass
Ribbon or flat braid (optional)

Time needed: Under 1 Hour
1. Use the kitchen shears to cut a whole in the bottom of your basket that's big enough for your child to fit her hand through.

2. Stick the work glove up through the hole, leaving the cuff out.

3. Secure the cuff to the bottom with craft glue.

4. Tuck the thumb of the glove into the basket and glue it out of sight.

5. Cut four small triangular beaks out of the orange felt and four small combs out of the yellow felt.

6. Glue the combs to the tops of each gloved finger; glue the beaks -- slightly curved -- onto each "face."

7. Complete each face by gluing on a pair of googly eyes.

8. Add a small handful of Easter grass around the chicks in the basket.

Kid's Easter Crafts Bunny Greeting Card


Paintbrush
White acrylic paint
Paper plate
Colored card stock
Black and pink markers

Time needed: Under 1 Hour
1. Use the paintbrush to spread a thin layer of paint on the bottom of the paper plate -- this will be your ink pad.

2. Have your kids dip their thumbs into the paint and print them on the card. Their thumbprint will be the bunny's head. For the ears, have them press down only half of their thumb to make a long, skinny shape.

3. After the paint dries, they can decorate the face with markers, adding whiskers, eyes, and a nose.

4. Use a black marker to write "Some bunny loves you!" on the front of the card

Kid's Easter Crafts Bunny Masks


2 lightweight paper plates
Pink construction paper or crayons
White glue
Stapler
Hole punch
Narrow elastic

Time needed: Under 1 Hour
1. Cut one of the paper plates in half.

2. To make the ears, cut half-moon shapes from the pink paper, and trim them so they are smaller than a plate half.

3. Glue each half moon in the center of a plate half.

4. Position the ears on the other plate and staple in place.

5. Cut out openings for the eyes and trim around the mouth to shape cheeks.

6. Draw on a nose and whiskers.

7. Punch holes on the sides near the child's ears and secure a length of elastic so the mask fits snugly on your child's head.

Kid's Easter Crafts Easter Bonnet


Paper plate
Paper bowl
Glue
Craft knife
Poster paints and brushes
Crepe paper
Colored paper
Streamers
Oak tag
Pipe cleaners
Tape
Cotton ball

Time needed: Under 1 Hour
1. First, set the inverted bowl on your child's head to see if it fits. To make it smaller, cut the bowl into quarters, refitting the pieces so the edges overlap, and glue the seams.

2. To make a full brim, center the fitted bowl rim side down on top of the paper plate (also upside down) and trace around it. Use a craft knife (a parent's job) to cut a circle from the middle of the plate, staying 1/2 inch in from the line. Glue the rim of the bowl to the inner edge of the paper ring.

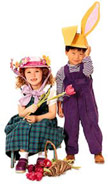
3. For a visor, like the oneshown on the rabbit-ear cap, cut a 7 by 5 inch rectangle out of the flat portion of a paper plate. Trace the front rim of the bowl along one long edge of the rectangle. Using this line as a guide, cut out a 3 inch wide crescent shape. Glue the bowl rim to the inner edge of the visor.

4. Cover the hat with a bright shade of poster or tempera paint and let dry thoroughly.

5. For a flowery bonnet, use a strip of crepe paper for a hatband?mix three parts glue to one part water and use a paintbrush to apply it around the hat, above the brim. Press on the crepe paper. Next, cut flowers out of colored paper and tape pipe cleaner stems to the backs. For each flower, use a tack to punch a hole through the hat. Push the stem end through and secure it with masking tape. For chin sashes, tape an 18-inch paper streamer to the inner brim on both sides of the hat.

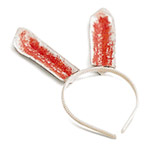
6. For the rabbit-ear hat, cut footlong ears out of oak tag, allowing for a 1/2-inch tab at the bottom of each. Paint the ear backs and front edges to match the cap. Once dry, shade the centers with a lighter hue. Use a craft knife (parents only) to make two 1/2-inch slits in the top of the hat. Push the ear tabs through and glue them to the inside of the hat. Finally, glue a cotton ball tail to the cap back.

Kid's Easter Crafts Baby Chick Card


1. To make the eggshell, cut a pair of matching ovals, one for the front and one for the back, from the white poster board (the shells shown here are 5 inches high).

2. Cut a simple chick from the yellow construction paper, making sure that it will fit within the dimensions of the egg. Use the colored markers to draw on eyes and a beak.

3. Center the chick on one of the white ovals and glue it in place.

4. Cut off the upper third of the other oval with a zigzag line that looks like a crack. Glue the bottom piece onto the chick, matching up the edges with the back oval, as pictured.

5. Lay the top piece of the cracked shell over the chick's head, but do not glue it in place. Instead, use the paper fastener to attach a lower corner to the rest of the egg (it should work like a hinge).

6. Finally, add your Easter greeting to the front or the back of the egg.

Kid's Easter Crafts Carrott Tree


Several 12-inch orange bumpy pipe cleaners
Several 4-inch lengths of green embroidery floss
Newspaper
Bare tree branch
Small flowerpot
Decorative stones or glass beads

Time needed: Afternoon or Evening
1. To make one, first cut several 12-inch orange bumpy pipe cleaners into quarters to create four 3-inch pieces, each with a wider part at its center (see photo).

2. Form each piece into a carrot by folding over about ½ inch at one end and tying on several 4-inch lengths of green embroidery floss at the bend. Trim the floss, if necessary.

3. Slip a loop of floss or string under the folded end for a hanger, then fold up the bottom tip of the pipe cleaner as well.

4. Next, use balled-up newspaper to support a bare branch (ours was about 10 inches tall) set upright in a small flowerpot. Add a layer of decorative stones or glass beads, then hang the pipe cleaner carrots on the branch.

Kid's Easter Craft Baby Chicks


2 round wooden beads (we used one 16-millimeter and one 25-millimeter bead) with holes large enough for a doubled pipe cleaner to fit through
6-inch pipe cleaners
acrylic paint
craft feather
fine-point marker

Time needed: Under 1 Hour
1. First, paint the beads with acrylic paint. When they have dried, bend a 6-inch pipe cleaner in half, sandwiching the end of a tiny craft feather in the fold.

2. Thread the smaller bead onto the opposite end of the pipe cleaner and slide the bead up to hide the bottom of the feather.

3. Thread the larger bead onto the pipe cleaner, then bend the ends of the pipe cleaner into feet.

4. Finally, use a fine-point marker to give your little chick eyes and a tiny beak.

Kid's Easter Craft Chalk Eggs


Plastic eggs
Petroleum jelly
Plastic spoon
Plaster of Paris
Powdered tempera paint

Time needed: Afternoon or Evening
1. To make a piece, first separate the halves of a plastic egg. Liberally coat the insides with petroleum jelly, adding extra near the seam, and then set both halves upright in an empty egg carton.

2. In a disposable cup, use a plastic spoon to mix together 1/4 cup of plaster of Paris, 2 tablespoons of cold water, and about 2 tablespoons of powdered tempera paint. Spoon the plaster into the egg halves, filling them both almost to the top, and let it set for a few minutes until it reaches a mudlike consistency. Then snap the plastic egg back together and briskly shake it to combine the mixture.

3. Repeat for each color of chalk, disposing of the cups and spoons in the trash. Let the chalk eggs set overnight before removing them from the molds, wedging the tip of a table knife between the chalk and the plastic (a parent's job) to help loosen it, if needed.