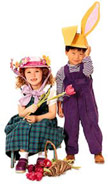
Kid's Easter Crafts Easter Bonnet

Paper plate
Paper bowl
Glue
Craft knife
Poster paints and brushes
Crepe paper
Colored paper
Streamers
Oak tag
Pipe cleaners
Tape
Cotton ball
Time needed: Under 1 Hour
1. First, set the inverted bowl on your child's head to see if it fits. To make it smaller, cut the bowl into quarters, refitting the pieces so the edges overlap, and glue the seams.
2. To make a full brim, center the fitted bowl rim side down on top of the paper plate (also upside down) and trace around it. Use a craft knife (a parent's job) to cut a circle from the middle of the plate, staying 1/2 inch in from the line. Glue the rim of the bowl to the inner edge of the paper ring.
3. For a visor, like the oneshown on the rabbit-ear cap, cut a 7 by 5 inch rectangle out of the flat portion of a paper plate. Trace the front rim of the bowl along one long edge of the rectangle. Using this line as a guide, cut out a 3 inch wide crescent shape. Glue the bowl rim to the inner edge of the visor.
4. Cover the hat with a bright shade of poster or tempera paint and let dry thoroughly.
5. For a flowery bonnet, use a strip of crepe paper for a hatband?mix three parts glue to one part water and use a paintbrush to apply it around the hat, above the brim. Press on the crepe paper. Next, cut flowers out of colored paper and tape pipe cleaner stems to the backs. For each flower, use a tack to punch a hole through the hat. Push the stem end through and secure it with masking tape. For chin sashes, tape an 18-inch paper streamer to the inner brim on both sides of the hat.
6. For the rabbit-ear hat, cut footlong ears out of oak tag, allowing for a 1/2-inch tab at the bottom of each. Paint the ear backs and front edges to match the cap. Once dry, shade the centers with a lighter hue. Use a craft knife (parents only) to make two 1/2-inch slits in the top of the hat. Push the ear tabs through and glue them to the inside of the hat. Finally, glue a cotton ball tail to the cap back.
0 Comments:
Post a Comment
<< Home